Seventy years old next year for both of us. I want to do something special for Rhea's birthday. I am going to attempt a marquetry piece featuring the three grandsons. Should be quite the challenge. I was not completely happy with the veneer selection I used for the last two projects, so will need to find more, especially varying shades of lighter wood.
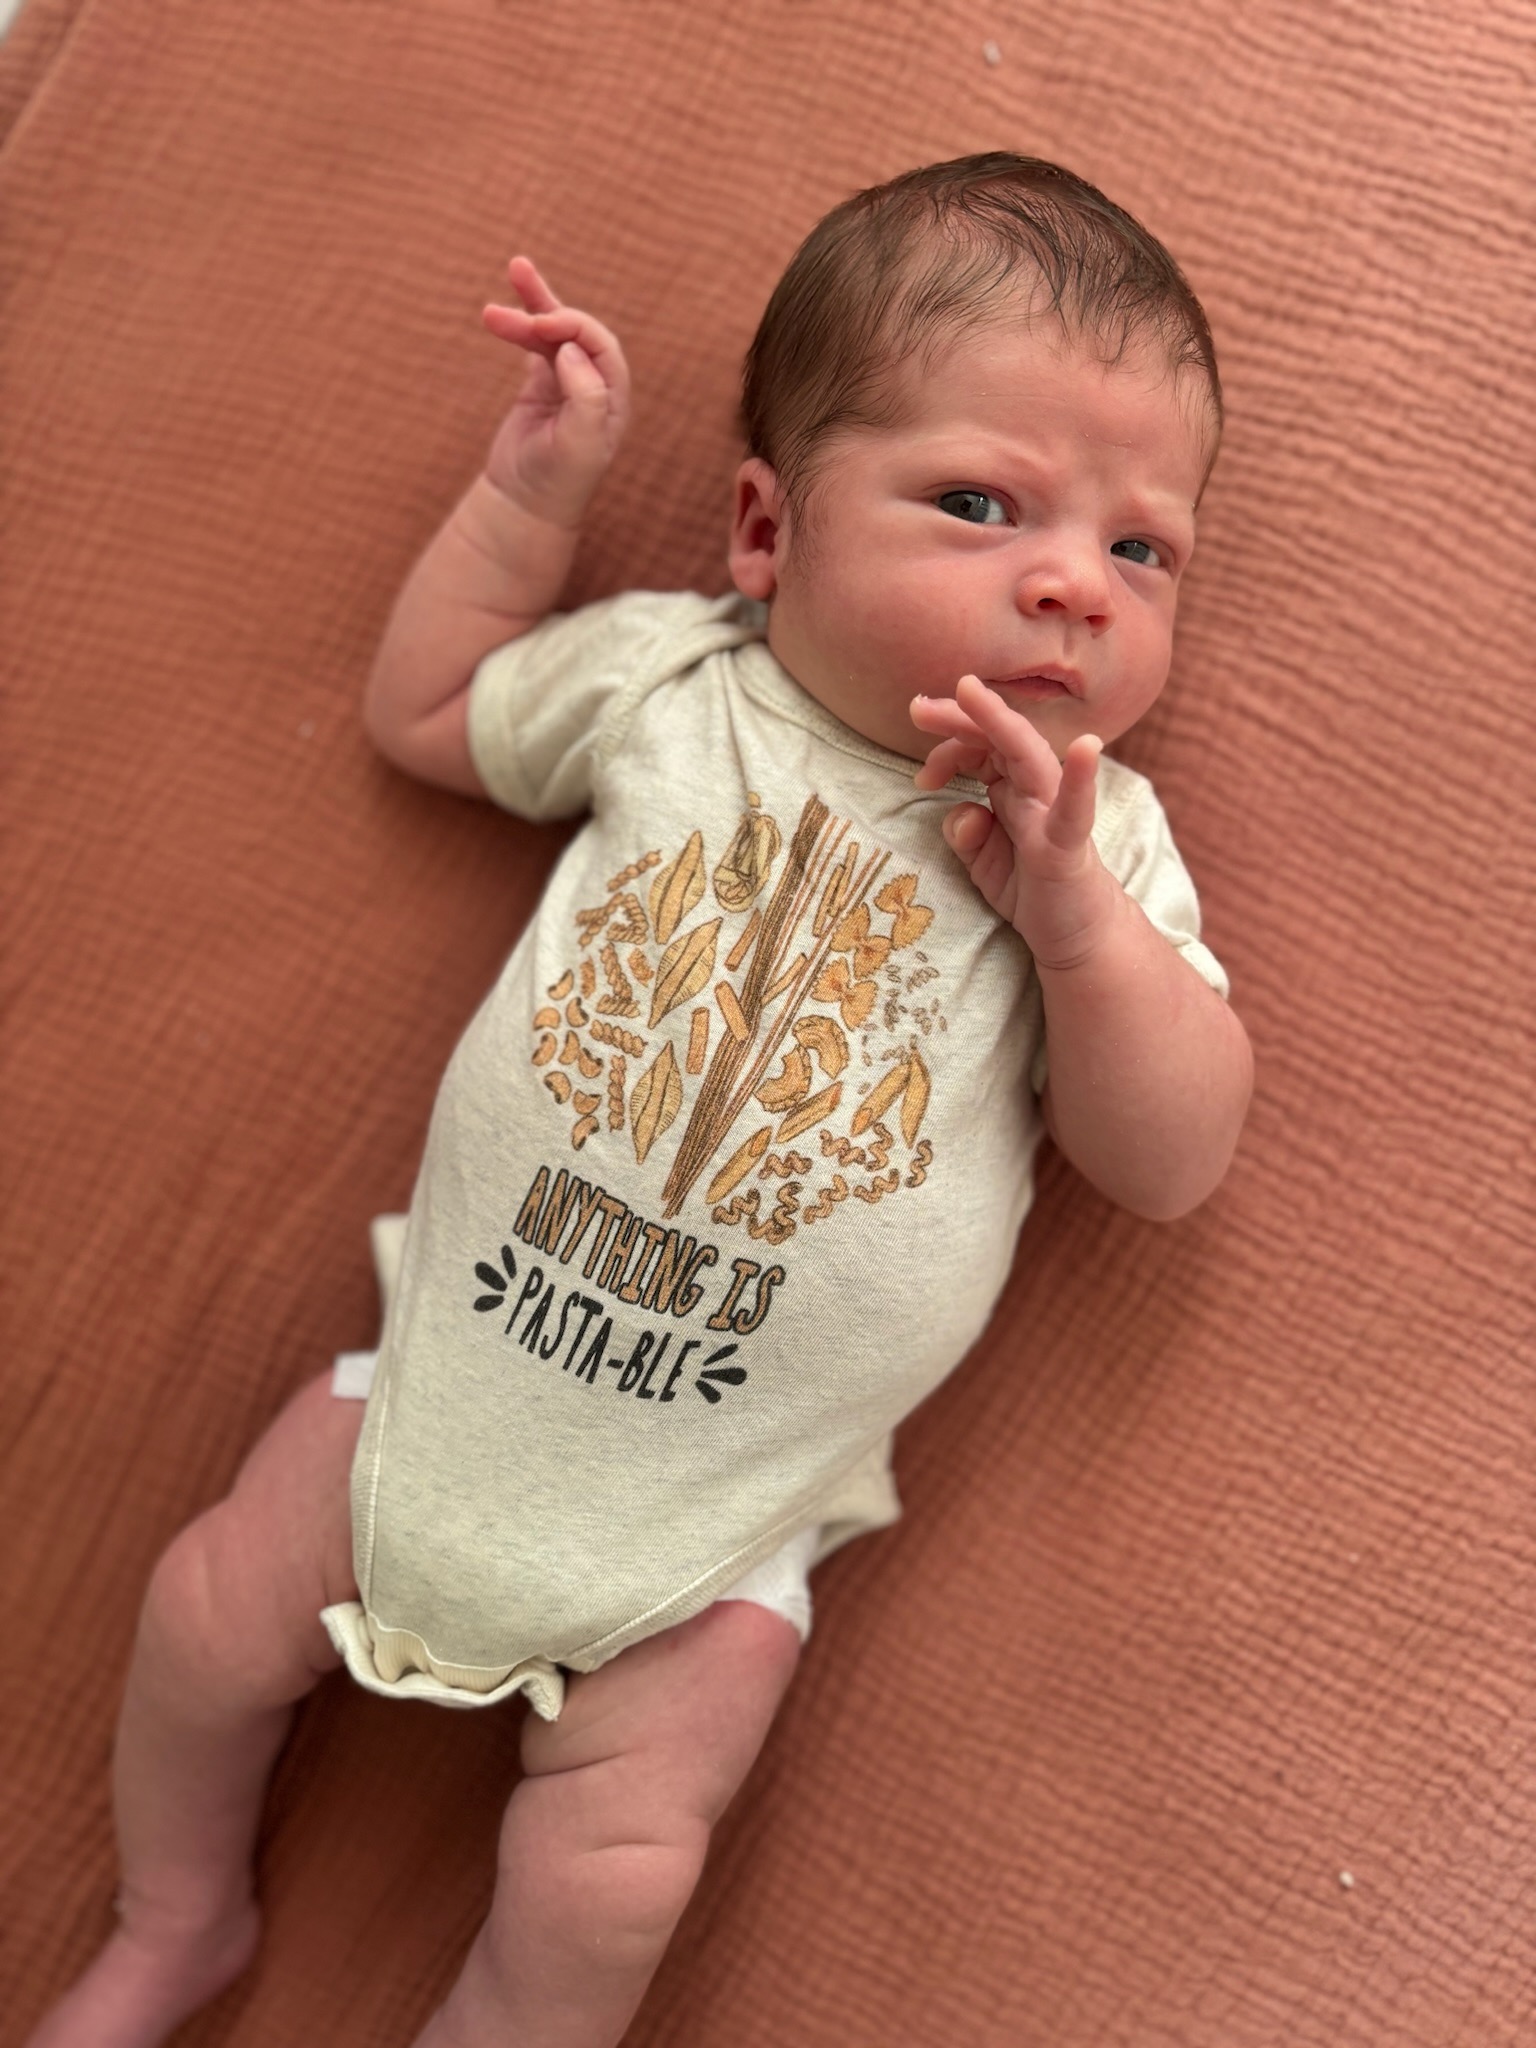
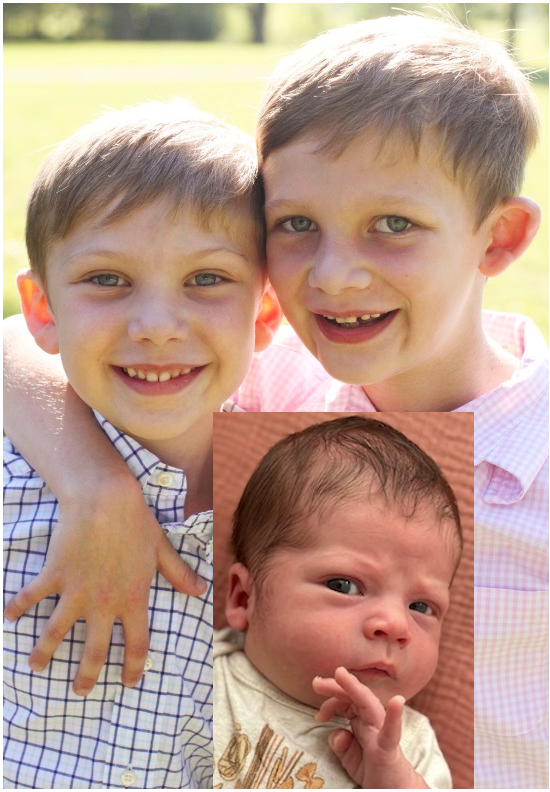
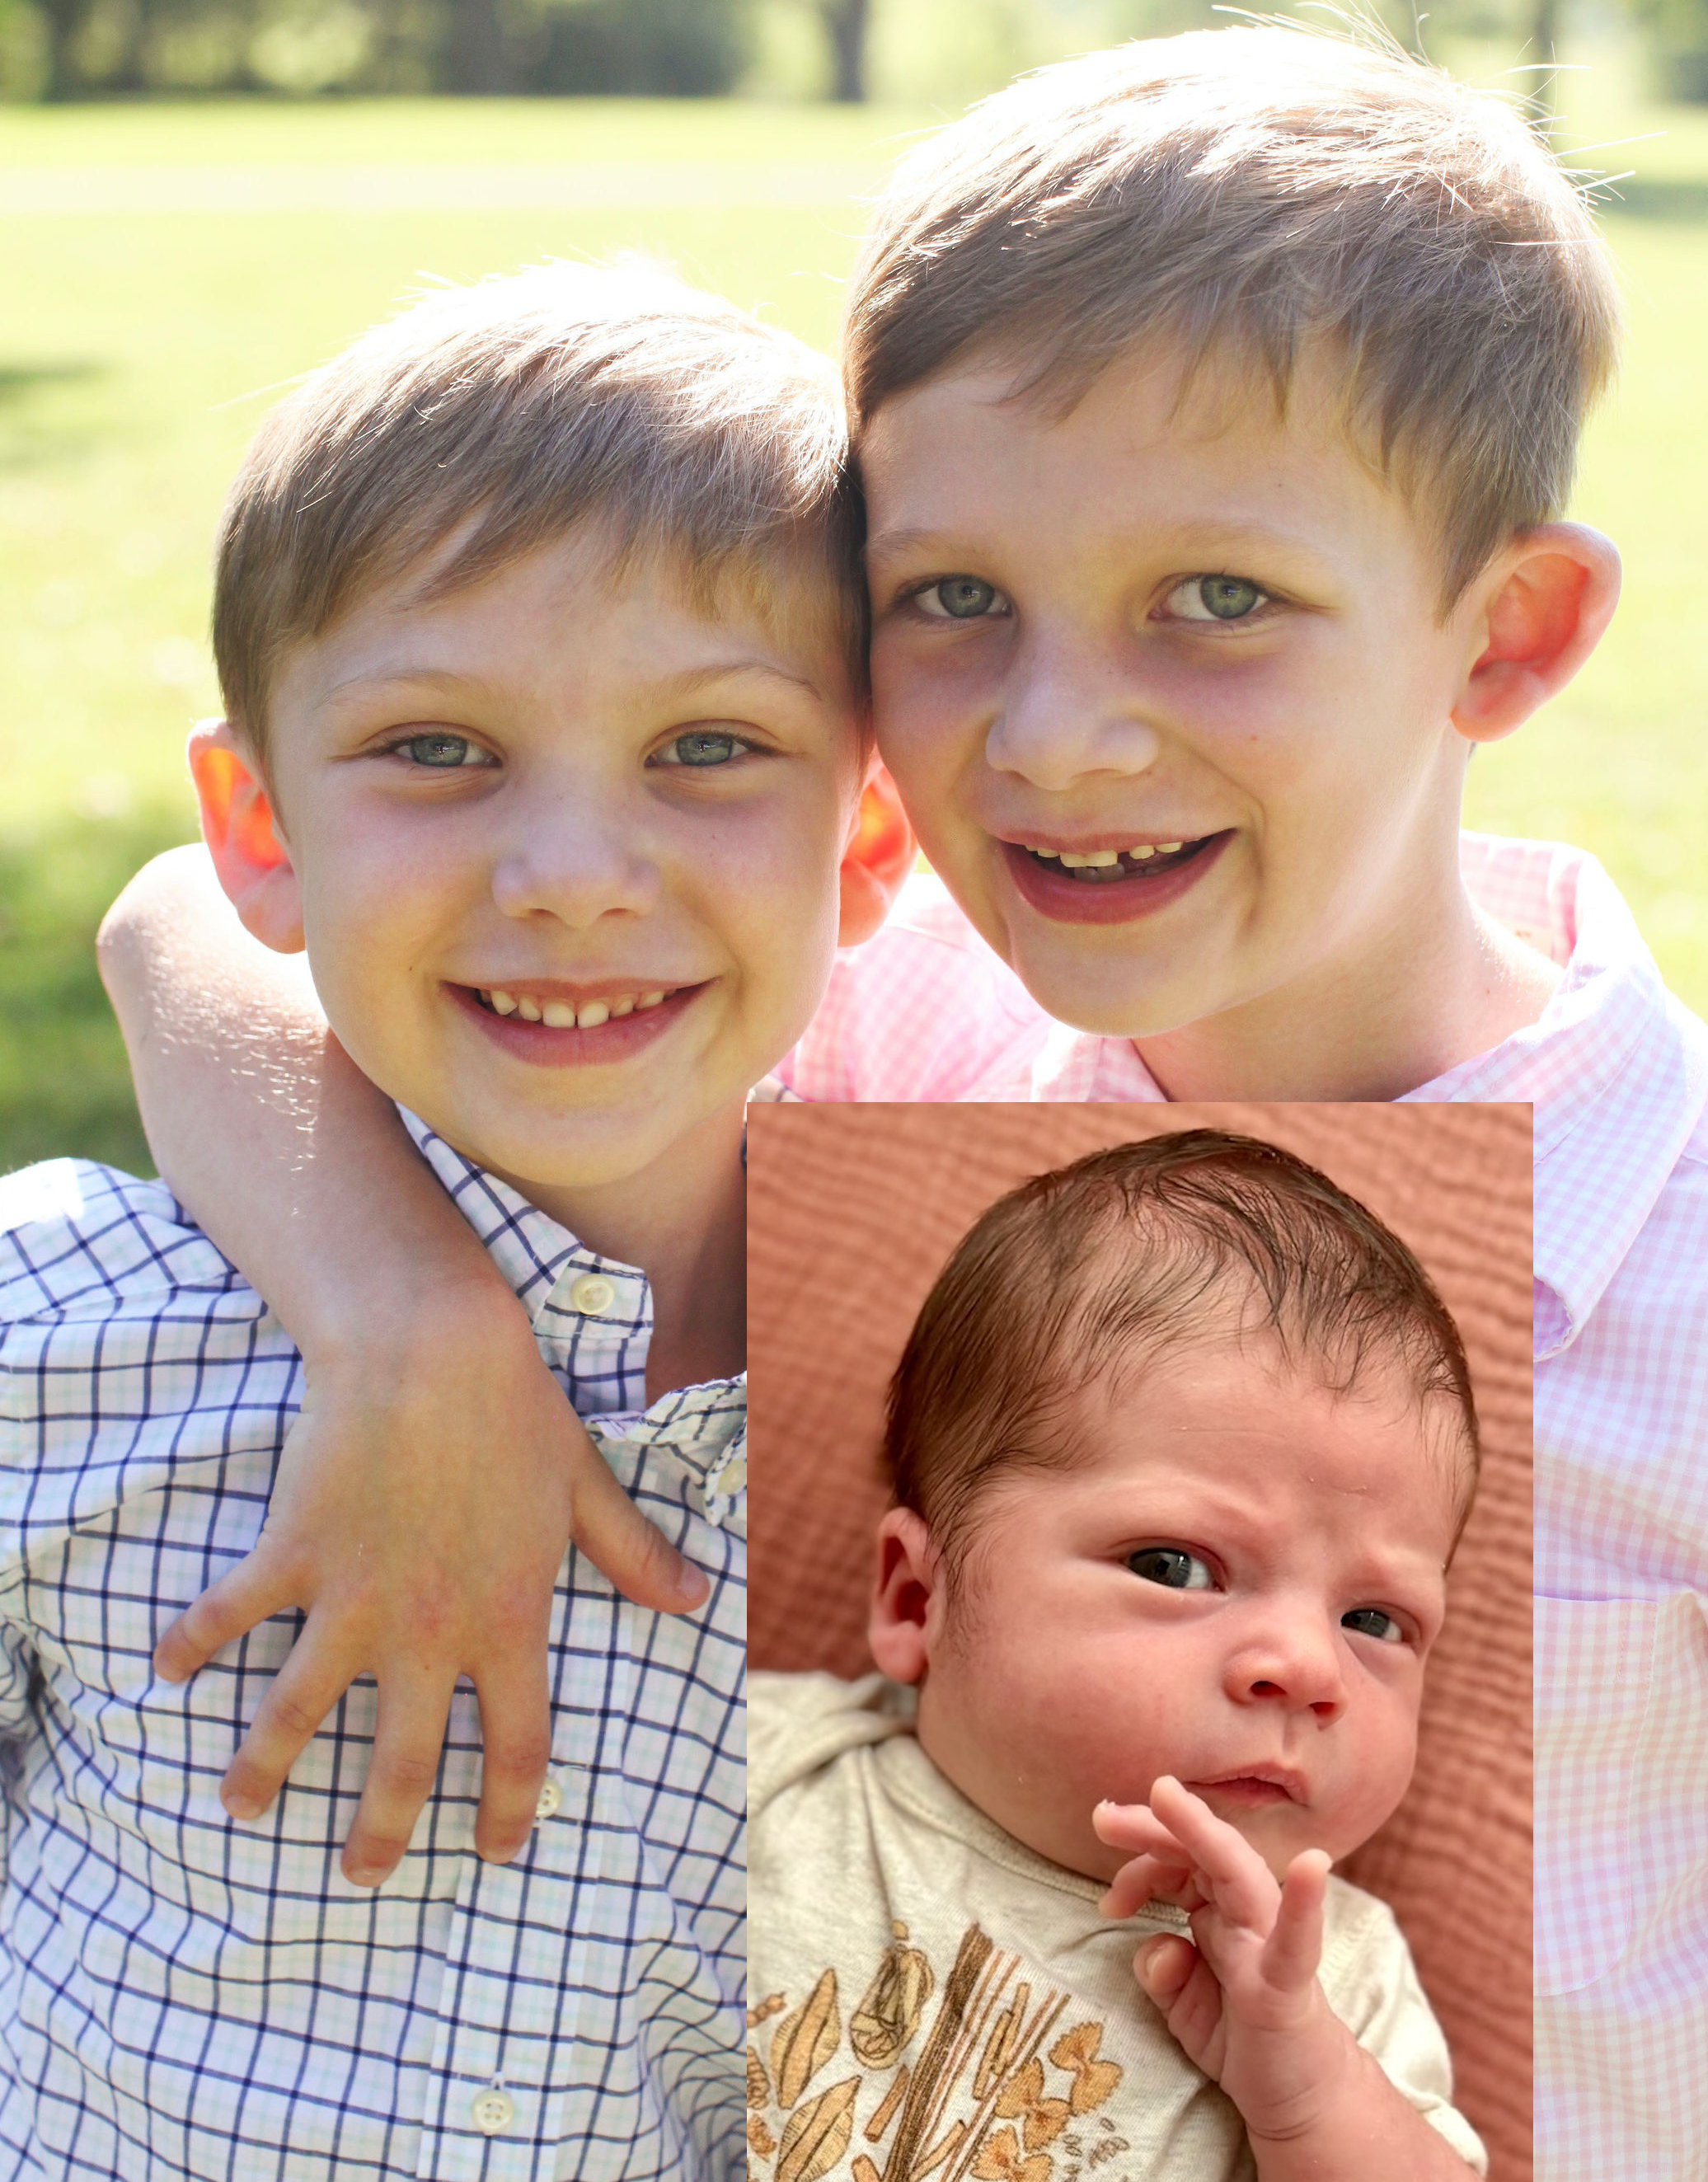
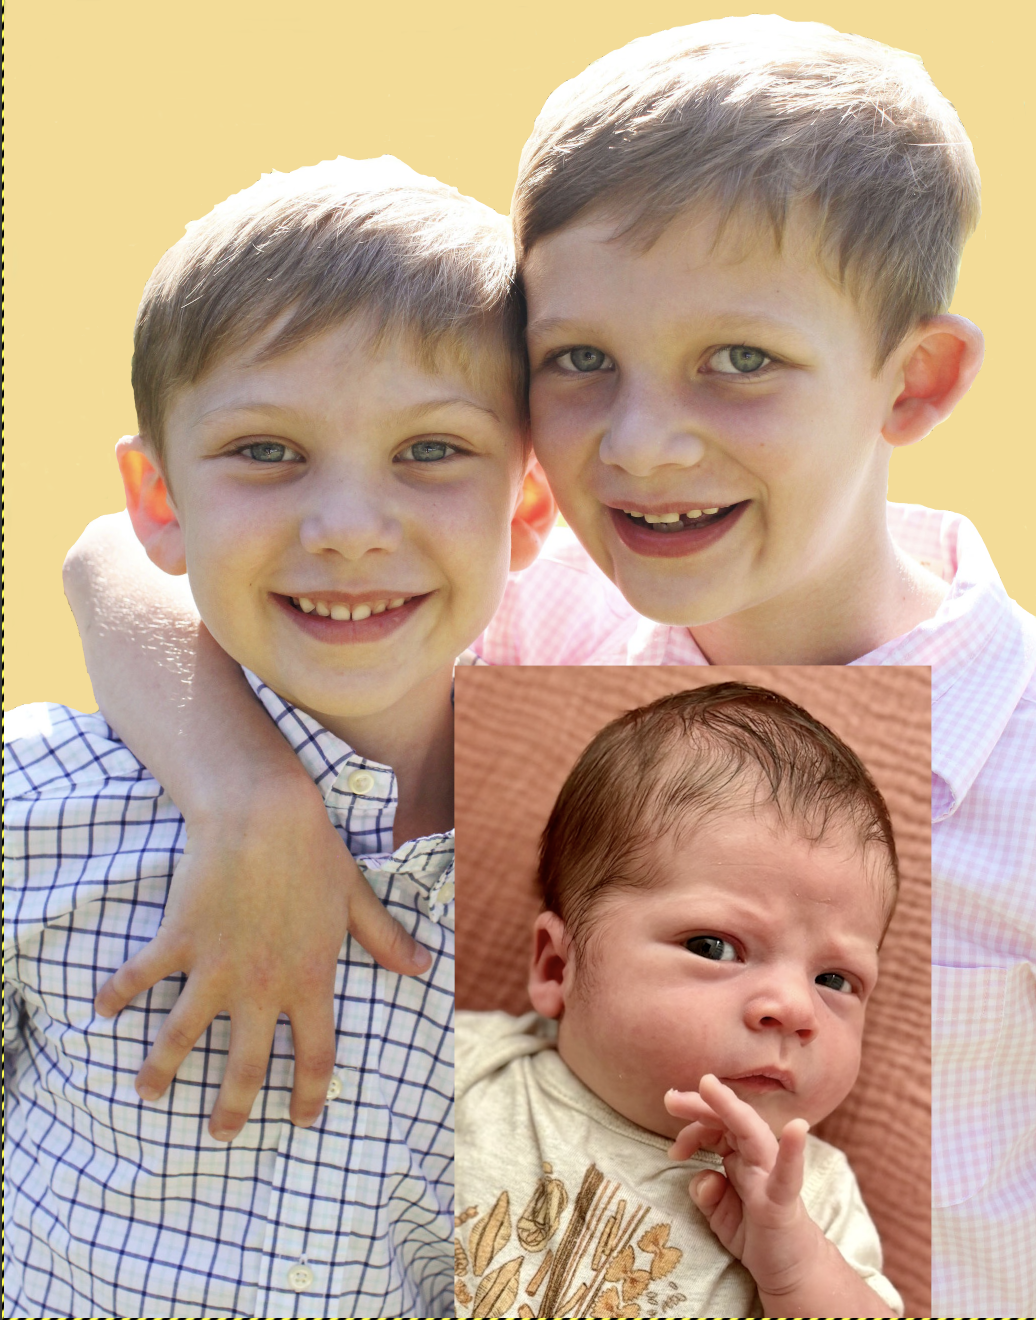
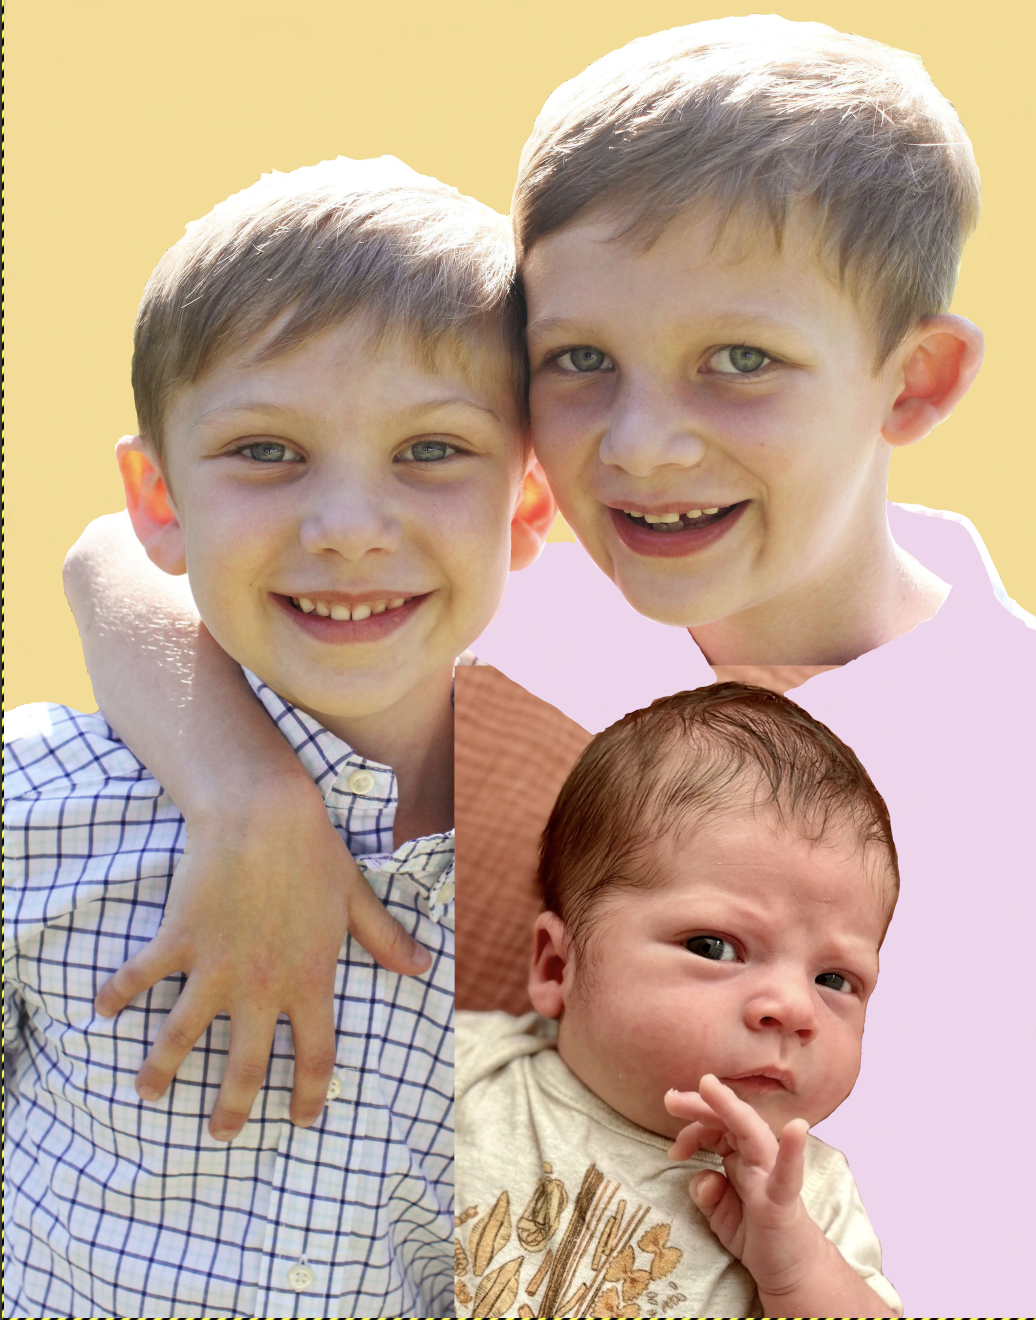
The first challenge is finding, or in this case, creating a photo of the three boys. No appropriate photos of all three are available. Two years ago we had family photos taken at a nearby park. A photo of Levi and Oliver was selected from the available choices. A photo of Freddie was found on the shared album, that I particularly liked as his hand is also featured. Both photos have enough shading in the faces that I believe they will transfer well to marquetry. These two photos are shown below.

The first step is combining the two photos into one, a project in and of itself. Freddie's photo needs to be lightened to match the Levi and Ollie photo. Then Freddie's photo needs to be cropped and inserted into the L&O photo. Ideally, I would keep Levi's arm and have it resting over Freddie. The combination does not need to be perfect as any imperfections will be lost in the transfer to wood.
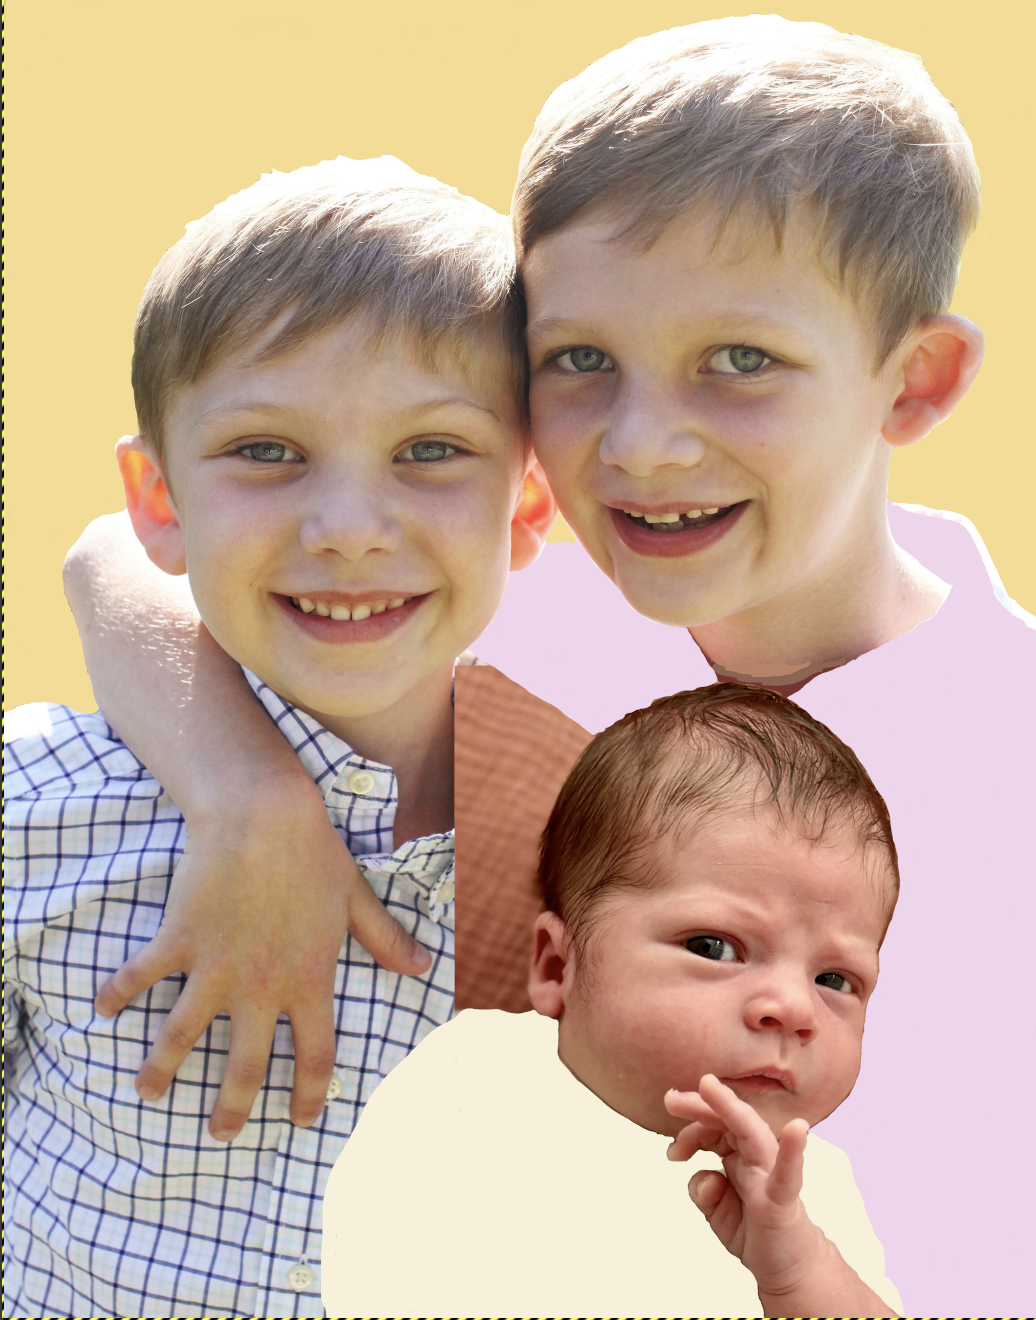
I would like to use Gimp, a premier photo editor, but have struggled trying to learn its intricacies. Consequently, I started with Graphic.app, a simpler interface, but not necessarily designed for manipulating photos. Graphic was useless for photo manipulation. Gimp was its usual incomprehensible self. None of the selection tools seemed to work with the exception of the rectangular selection. The picture below is a rough approximation of what I would like to begin with. I like the hands pointing at one another and the line, paralleling the hands, made of Ollie's and Freddie's heads. Redone with Freddie lightened a bit is seen in the second photo below.
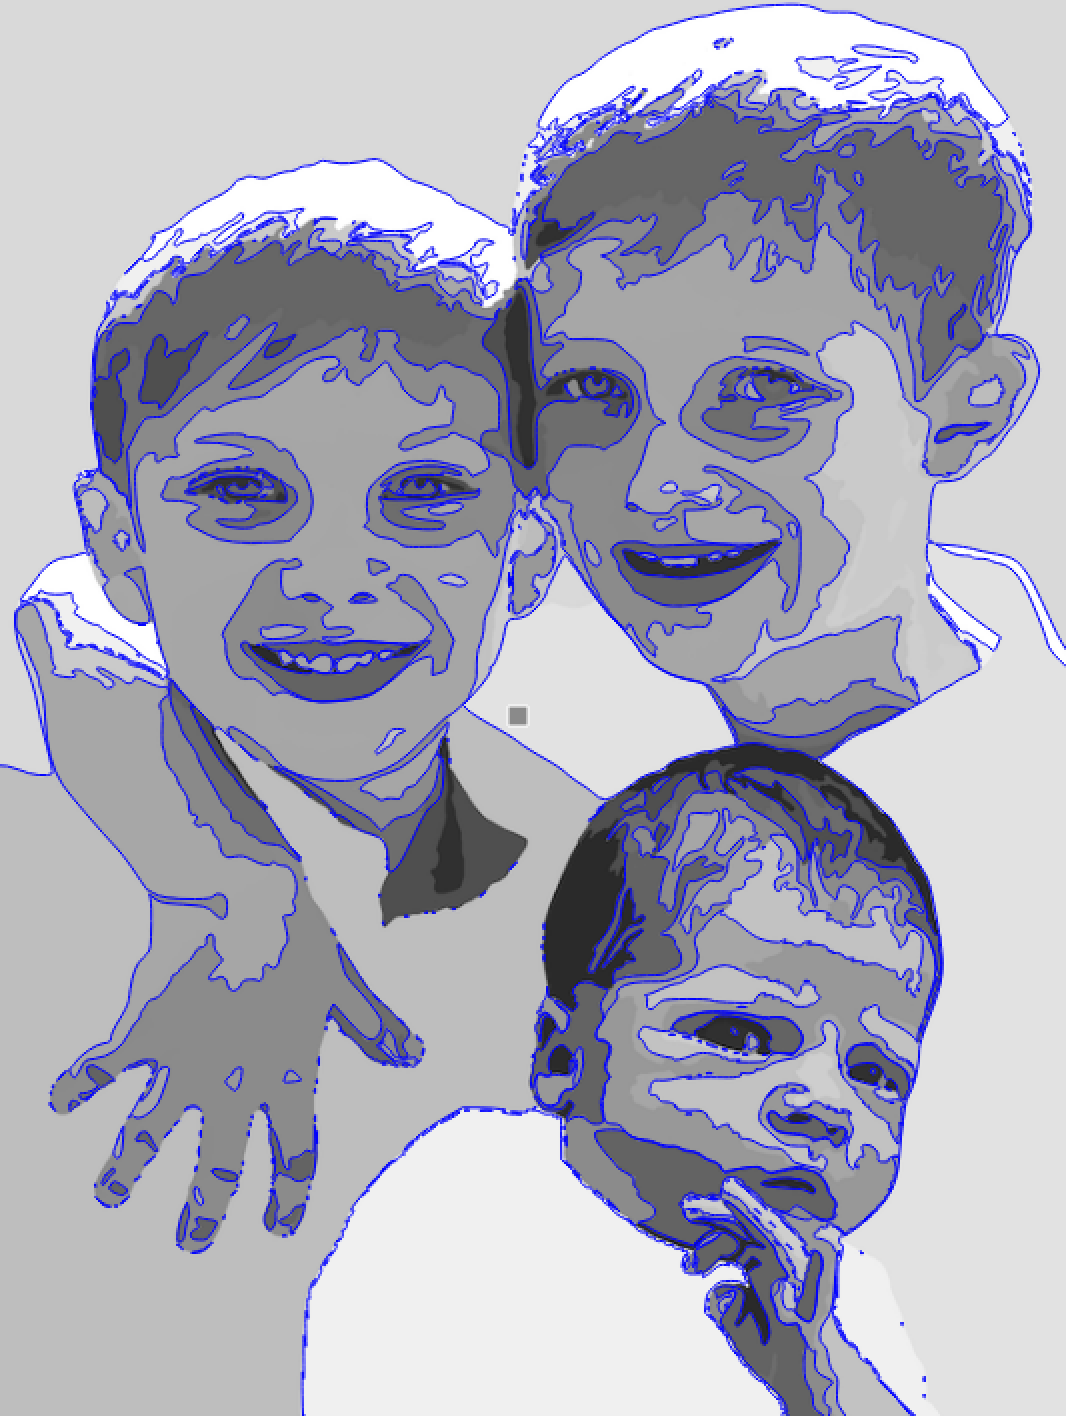
After printing the second photo from above was outlined by color and shade resulting in the picture below. Selecting the appropriate veneers is the next step and is challenging. I don't have enough light veneers, and especially shades of pink. The big box of veneer needs to be studied to determine how many shades of white and pink are available. Afterwards, I will need to purchase veneer to make up the difference.

Copies of the outlined photo were made this morning after months of no action. Two packages of veneer were purchased from Woodcraft as well as some dyed veneer from Bob Behnke via Marc Adams School of Woodworking in the interim. The packages were purchased as too much of the veneer I own is relatively dark and lighter veneer is needed for most of the three faces. Both packages were inspected before purchasing to make sure they had many sheets of lighter veneer, probably not high on most veneer shopper's lists. The minimal selection of lighter veneers was problematic on the last marquetry project
The various outlined areas were numbered from 1-17, with the first ten running from lightest to darkest. Other more unique areas were assigned veneers as well. Finally, the four backgrounds, three shirts and the background behind two of the heads, were chosen. The veneers selected as well as the numbered copy of the design can be seen in the photo below. The babies face will use the same veneer as the two older boys so it should not be so dark in the final product.

The lines separating the different shades and colors were traced onto a blank sheet of paper. This tracing is seen below and does a good job of depicting the three boys, though the youngest's right shoulder looks a little off as it was only a guess.

With the Creality Falcon 2 laser not yet functioning and my deadline rapidly approaching this project will begin the old fashioned way with packets cut on the scroll saw. Some obvious packets were quickly highlighted with colored pencils. The hair on all three boys make up three packets. Similarly, the four ears are another four packets. The eyes are easy to delineate so became six more packets. Noses and mouths are another six packets. Freddie's hand was divided into five packets, four fingers and the ring finger combined with the arm. Levi's arm is not so easy to discern from his hand and fingers, so it might be one large packet. Freddie's forehead and both cheeks can be separated into three packets, pretty much completing him except for his shirt. Levi's neck is a separate packet as is Ollie's. There is no easy way to make packets from Levi's or Ollie's face so these may remain each a full packet. A total of 32 packets for now.
The entire set of outlines was transferred to tracing paper. Looking at the ears, the first packets to be tackled, changes were made to veneer selection. Each of the ear packets was transferred individually to a second sheet of tracing paper. The ears were the first packets to cut as they are reasonably simple and will allow me to get reacquainted with the scroll saw.
With the success recently achieved with the laser cutter, focus has shifted in that direction. The question is how to turn my picture of the boys with lines for cutting into a vector image that the laser can cut. So far a few things have been attempted in Gimp, LightBurn and Inkscape. All are complex programs not conducive for a novice to easily utilize. Just using the lines I drew on a printed picture has not been successful, yet.
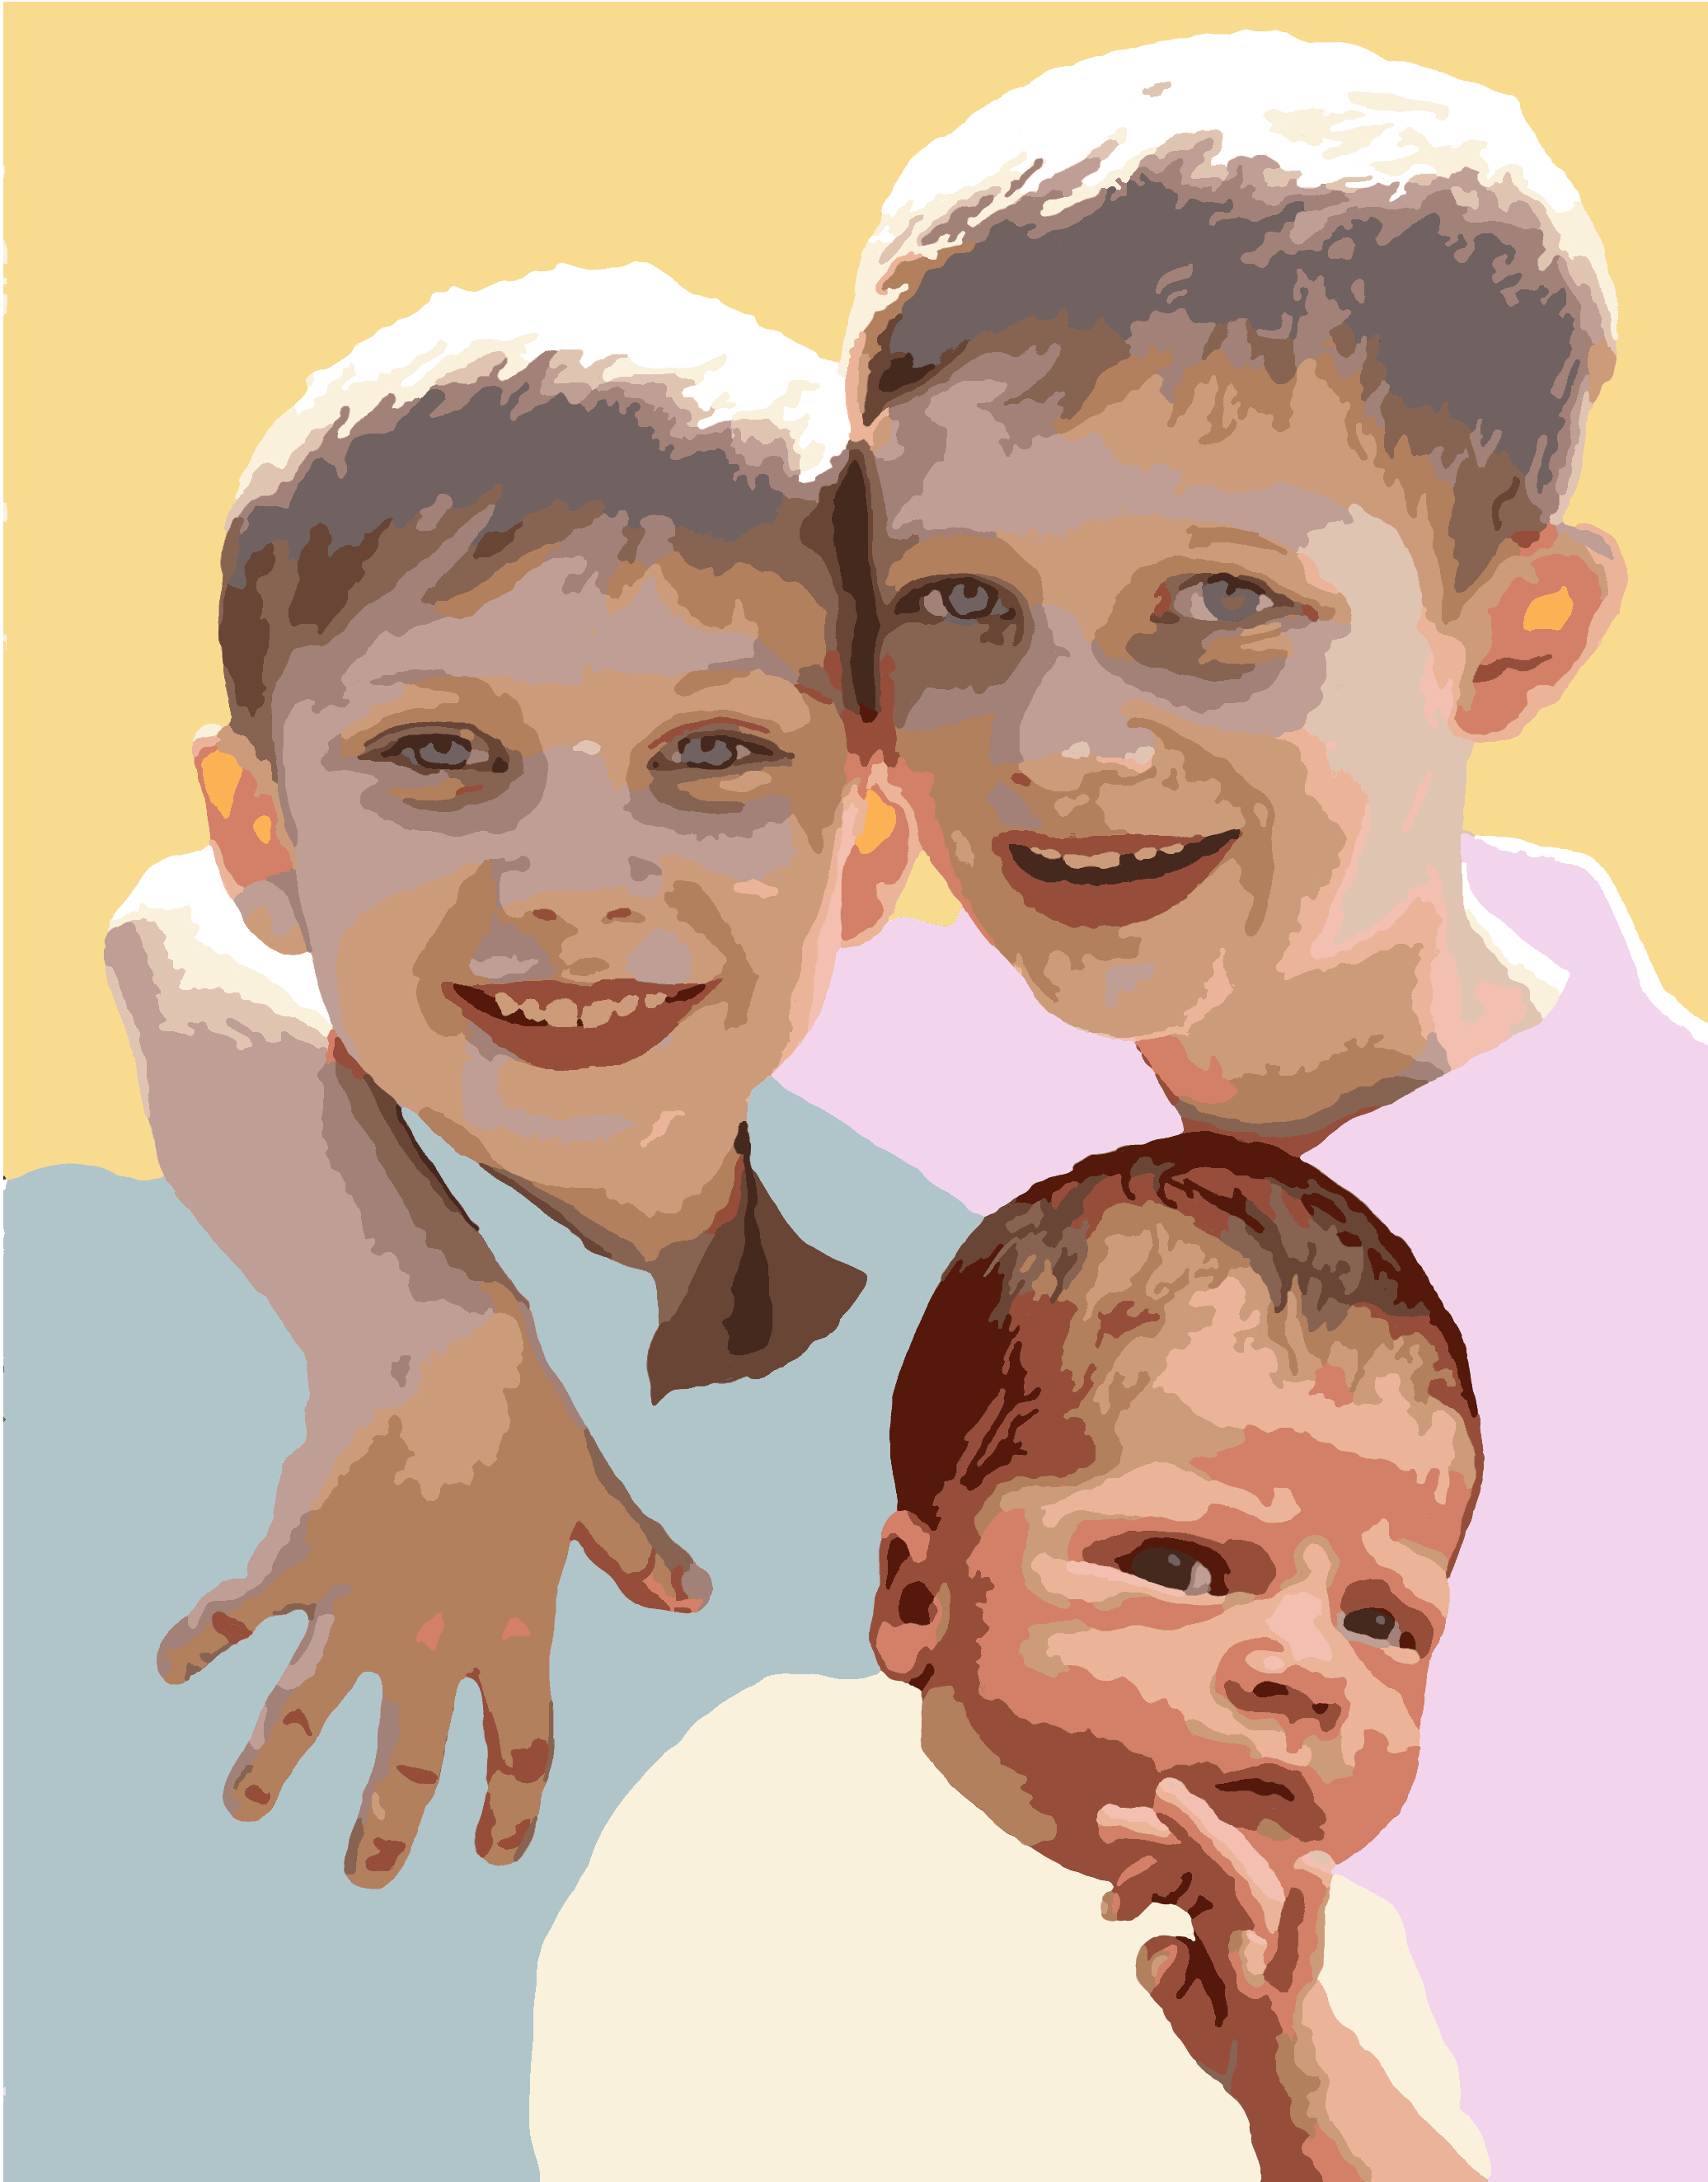
A potential solution was found in a YouTube video on LightBurn. It has a trace tool that automatically finds the edges within images and turns those into a vector drawing. Unfortunately, using my photo of the three boys, the lines are horrendously complex, not useful for cutting veneer. So my next attempt is using Gimp and the filters it contains to 'blur' the boundaries between regions of different shades. The photo was converted to black and white with Gimp's Colors:Desaturate:Colors to Gray menu command.
The goal of exploring Gimp's many filters is to find one that cuts the variation in shade into ten to twenty grays, almost like an elevation map. The map can then be traced with LightBurn, hopefully giving reasonable lines for cutting veneer. There may also be a filter on the web that meets my needs.
Discovered a package of filters called G'MIC. Unfortunately it is not immediately available on the Mac. Another route to access this opensource software was discovered. An installer that runs through the terminal and builds the application, MacPorts, has a port of G'MIC. MacPorts was downloaded and install attempted from Terminal. The first install failed. A bit of research indicated that I did not have Xcode Developer Tools installed on the Mac, so this was installed via the App Store.
A second attempt to install G'MIC took ages, 19 minutes, to complete as there were so many dependencies, none of which are on my computer as this is the first time I have installed software this way. But it worked! Or I thought it did. What it did was install G'MIC in the Gimp 2.0 folder and the file moved to the 3.0 folder did not cause the filters to appear in the Gimp menu!! An online forum was searched and a correct version of this file was downloaded and installed in the 3.0 folder, but still no changes in the Gimp menu upon quitting and restarting the program.
I have posted my challenges in three different discussion forums. One reply showed how to accomplish what I want with filters already included in Gimp, particularly a filter called "Oilify", which causes the photo to look like an oil painting. Using this filter with the suggested modifications to some of its parameters did produce a pretty good reduction in shades with smooth borders between the shades. One problem is the backgrounds. These use up the shades and lead to problems around the faces.
After a few experiments I painted over the backgrounds with about two hours work. Each of the four backgrounds was represented by one color selected from the background with the color picker tool. A paintbrush, size 25, was used to fill most of the background. A smaller, size 10, paintbrush painted the background's edges. A couple of areas needed to be filled with skin colors in the neck areas that were obscured by adding Freddie's photo. These touchups were also carried out using the same process as the background changes. This process is documented in the five screen captures below.


IMPORTANT: These backgrounds will need edges shaded where they abut the boys faces in order to give a more 3-D like appearance.
The photo combination was imported into Gimp for the third or fourth time. The Artistic/Oilify filter was applied with the following parameters: 9, 14, 10 (brush size, iterations, number of shades). The number of shades is not a direct accounting of the number of shades portrayed!? This image was saved.
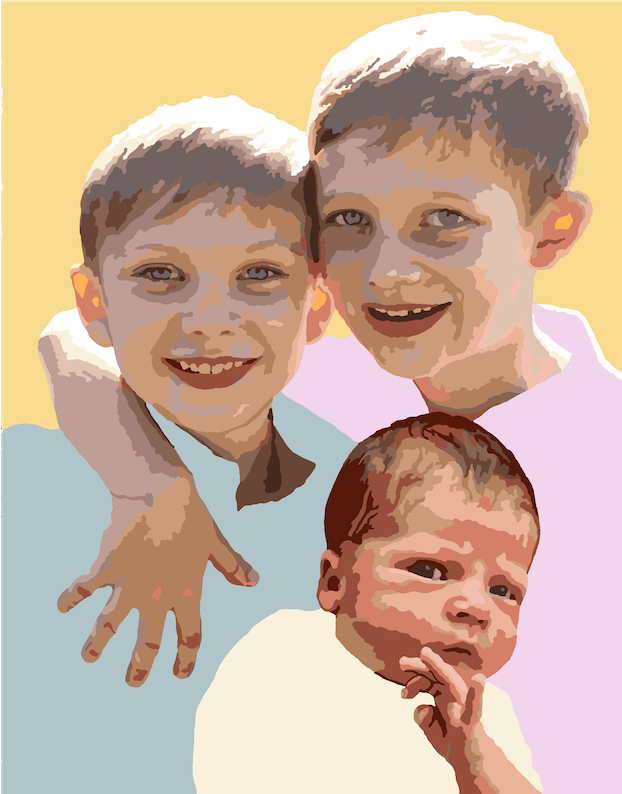
Then a different approach was also tried, Mode/Indexed. This produced a similar output to the above, but one that I preferred. As expected both processes produced many artifacts and often quite complex borders between colors. This second image was touched up by hand, going over every square mm to get rid of artifacts and smoothing borders. After six hours the touching up is done, though I am sure I could find more things to tweak. The exported png image below shows the current state.
Freddie's baby picture which was inset shows his complexion as very ruddy. He is darker than his cousins, but I will ned to be careful with the veneer selection so he is more of a match to the sun lit picture of Levi and Oliver. The picture below is the result of a few more touchups the next morning.
The png image from above was imported into LightBurn. The png image was imported as grayscale for some reason. The image was selected and the Trace tool selected from the Tools menu. Oy! Yet another learning curve. Not all of the tracings can be done at the same time. I may have to create a layer for each set of tracings, though they don't correspond completely to the grayscales. The layer 01 was tracings with cutoff = 90 and threshold = 128. Layer 02 was 150 and 180. The third trace was done a 207 and 240. It is not clear that all shades of gray were outlined, but certainly most were. The screen capture below shows the traced edges.
The outlines need to be ungrouped and then separated into the shapes that correspond to each veneer. To begin this process it was back to Gimp where the each color was given a number and all of the shapes with a given color were labeled. A table with these labels and what parts of the picture are labeled.
Upon closer examination I realized that LightBurn missed some shades. Closer examination shows the png used when converted to grayscale by LightBurn no longer has some shades! The missing colors are there in the png exported by Gimp. Back to Gimp to find a way to process the colors before returning to LightBurn for tracing.
Using Gimp's select by color ability, each of the colors was selected and each fragment of that color was labeled with a number. The numbers and where the corresponding colored bit resides are in the table below.
| Number | Areas Labeled |
|---|---|
| 1 | O hair, L hair (2), L arm, L collar |
| 2 | O hair (5), L hair (5), L arm, L collar |
| 3 | O hair (5), L hair (10), L arm, L cheek, L nose (2), O finger |
| 4 | O hair (3), O ear, O face (5) L hair (6), L arm (4), L face (4), L ear, L neck, F eye |
| 5 | O hair (8), O ear, O face (7), O eye (3), L hair (16), L arm (8), L face (4), L neck, L eyes (2), F eyes (2) |
| 6 | O hair (1), O ear, O eyes (3) L hair (1), L eyes (4), F eyes (2) |
| 7 | O hair (4), O eyes (4), O neck, L hair (2), L eyes (4), L arm, F hair (8) |
| 8 | O hair (5), O eyes (5), O neck, L hair (7), L eyes (4), L arm (9), L neck, F hair (4), F hand |
| 9 | O face (1), O eyes (4), O neck, L hair, L arm , L eyes (2), L mouth, O eyes (2) |
| 10 | O eyes (4), O neck, O face (8), L face (3), L neck, L hair (4), L eyes (4), L arm (6), F hair (4), F face, F hand (4) |
| 11 | O teeth (3), O ear (2), O eyes (2), O neck, O face (6), L teeth (4), L face (8), L neck, L hair, L eyes (2), L arm (2), L ear, F hair (5), F face (10), F hand (3) |
| 12 | O ears (3), L ear, L neck, L arm (4), F hair, F face (5), F ear (2), F hand (7) |
| 13 | O eye (2), O ear (2), O face (4), O neck, L nose, L face (2), L ear (2), L neck, L arm (12), F hair (7), F face (5), F hand (4) |
| 14 | O ear (4), O face (3), L face (2), L ear, L hair, F face (6), F hand (5) |
| 15 | O face, L face (2), L face (3), F face, F hand (4) |
| 16 | O face (3), F hair (2), F eyes (2), F ear (3), F face (3), F hand (3) |
| 17 | O ears (3), L ear |
With all of the colors completed and labeled it was time to separate the colors into groups. The numbers needed to be turned off and the layer after the photo layer was selected, causing me to realize that each and every number was in a separate layer!! A new layer was created for the first number, but no layers were created by choice for the remaining numbers. In any event all of the many layers containing numbers were turned off.
The colors were selected individually with the By Color Select, selection tool. The colors were identified by the number of colors in different places from the table above. Each color was copied and a new file was created from the clipboard via a command in the File menu. Two more files were created with the two background colors, blue and yellow.
Each of these files had a contrasting background color added with the Bucket tool in order to completely outline the pieces. This revealed many artifacts that had to be removed by hand, about five hours of work. In the end all of the files were cleaned up and are titled by the color numbers in the table above. All of these files are in the Gimp, xcf format, so were exported to new files in the png format for import into LightBurn.
A png file was opened in LightBurn, the image selected and The Trace Image command was utilized. This vector tracing was cut to the clipboard, the picture was deleted, and the clipboard contents were pasted into the blank window. (A shortcut was discovered that deletes the original image leaving only the tracing.) The vector graphic was selected and then ungrouped. If a part was on the edge, a line was drawn across the gap and the frame was cut away. Each of the parts was dragged onto the outline of the cutting area and the LightBurn file was saved under the same name, e.g., Color 1.lbrn. Most importantly, all of the tracings are smooth curves as seen in the screen capture of Color 3, below.
As each part was moved into the cutting area, its orientation and relative position was maintained. Each of these pieces will need to be labeled after cutting and before removal, so the cut pieces can eventually be put into the puzzle in the correct location.
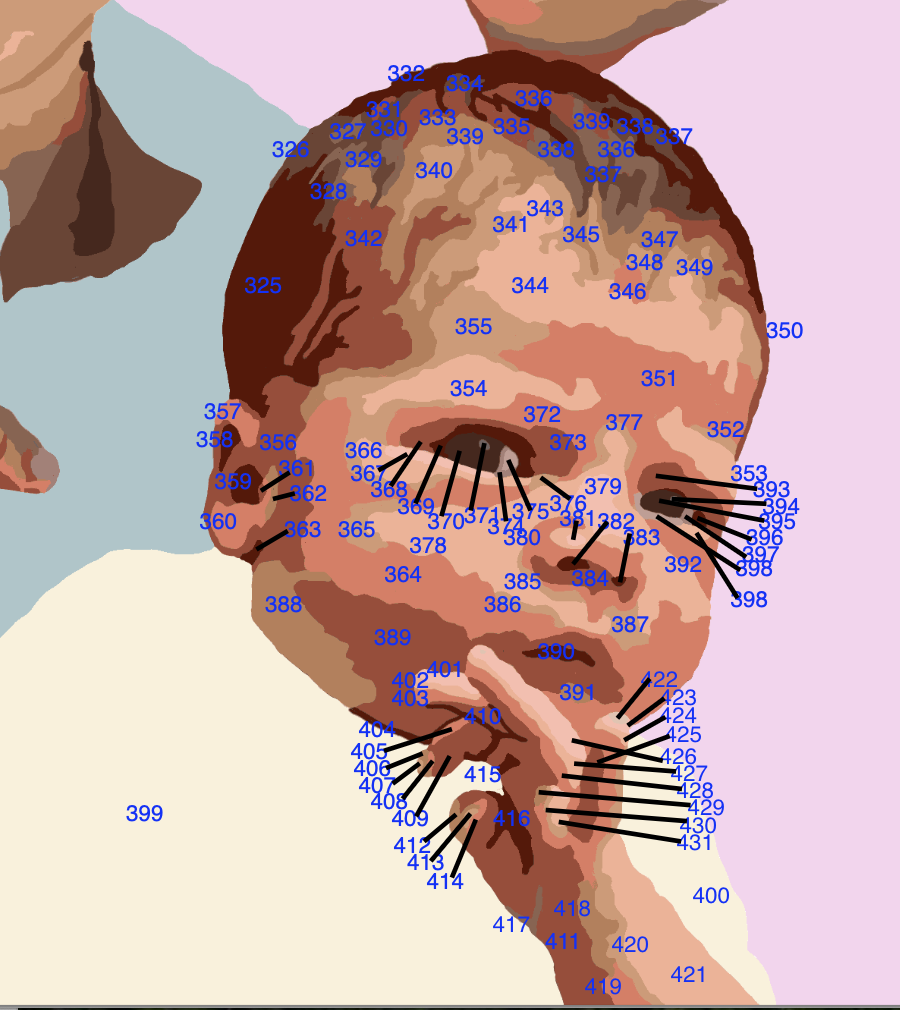
The morning was spent numbering all 431 pieces. This was done by annotating pdf copies of the Gimp document. The annotations were spread across three pdfs as Preview crashed when adding more than 150 annotations. The annotations are not just numbers, but also include lines for the more complex areas with tiny parts. A screen shot of one of the pdfs is shown below. The next step is reassigning veneer to the colors created by Gimp.
The veneer was spread out and along with the original color labeling of my hand traced image new colors were assigned to veneers. This process also utilized the color pngs and the Gimp processed image, LOFM indexed touchup.xcf, which was the source of the color files. After assigning all of the colors to veneers, I discovered that Levi's pink shirt background was never turned into a LightBurn tracing.
This tracing was made per the previous quick process from a selection in the original Gimp image. Something I noticed in LightBurn was that the tracing did not fit in the framed cutting area. Uh oh! All of the tracings are way larger than they should be! Somehow I need to determine their size and reduce them appropriately or I will end up with a marquetry picture that is three feet by four feet!
A png export of the Gimp image was 2072 X 2647 pixels per inch, translating to 28.778" X 36.764". A scaling factor of 3.34 to 3.39 reduces this image to 8 1/2" X 11", the planned size. A scaling factor of 3.36 is 29.76% scaling for the axes in the numeric edit toolbar in LightBurn. Each of the LightBurn files was reopened and the parts scaled appropriately. The individual parts of each color still need to be packed into a corner for eventual veneer cutting, while minimizing waste.
The first three veneer colors were gone over one more time to prepare them for cutting. A few issues were fixed before noting all of the part numbers for these three veneers. The computer was moved to the garage. After an hour spent fiddling with the laser cutter, I was unable to accomplish anything. On two occasions the laser came on appropriately, but the LightBurn software never recognized the machine via the USB. Cords were swapped with no difference. The laser was restarted numerous times, but only twice did the green light on the front panel turn on, though blinking. In these instances the controls on the front panel moved the laser appropriately. A frustrating morning.
Went online to chat with Creality this morning. The online support person needed three things in order to provide help. The first two were simple, a screenshot of my purchase invoice and a photo of the serial number and UPC on the back of the device. The third was a video of the laser attempting to boot up showing the lights. I went out to the garage, flipped the switch and the damn thing fired up. I forgot about the chat support and started cutting.
More laser power was needed to cut through the veneer than expected. The speed of the laser was slowed from 6000 mm/min to 4500. The laser power was boosted to 100% and the pattern was cut twice. This was overkill for some of the veneers, especially the darker veneers. A bit of finesse was involved in placing the veneer on the honeycomb so the laser was appropriately positioned in a corner and none of the pieces would be beyond the edge.
The contents of a particular LightBurn color file often needed to be shifted due to the constraints imposed by the size of the veneer. The parts were closely spaced and the dimensions on the screen were used to ensure the array of parts would fit on the veneer. All seventeen colors and three backgrounds were cut. The machine had to be restarted on a few occasions when my arm, while gathering the parts, hit the emergency stop button. Amazingly, the machine started up without a problem each time. The parts often fell from the veneer with the smaller dropping through the honeycomb support. These were collected with tweezers. Many of the parts were minuscule, implying the resolution of this rendition was much too high. I could have gotten away with much less detail. The video and picture below document the process.

The smoke from the laser cutting the veneer is clear in the above video and was quite heavy, so a fan was used during cutting to disperse the smoke. The cutting took over four hours on the coldest day in May, the garage door remaining open the entire time. In the end all parts were cut with only one veneer needing to be recut as the veneer had been improperly positioned and parts were not completely on the veneer. In this case the veneer was replaced with a different but similar veneer.
A few things should be kept in mind for future veneer cutting with the Creality. The position of the laser relative to the veneer needs better control and the built in mechanism should be used. I was in a bit of a rush this morning to complete the task while the laser was in a good mood so skipped this step. The power, speed, and number of repetitions, should be explored for each veneer to get optimal cutting with minimal burning, though very little burning can be seen on the parts cut today. Some of the veneers were not very flat and had to be held down at the corners and/or sides. A better approach to holding the veneer than scraps of metal would be useful, maybe magnets.
The next step in this process is assembling the hundreds of pieces into the picture. This may be as difficult as any other step to date. It is near impossible to distinguish some of the smaller parts from one another, though that may not make a difference. One thing I have yet to figure out is how to hold the tiny pieces in place as the puzzle is assembled. Clearly, tape of some sort will be required, maybe with the picture and pieces upside down, so the resulting taped image can be flipped onto the backing and glued as is.
The puzzle awaits! Not quite sure how to tackle this, so will experiment. Some low tack glue, Krylon Easy-Tack Repositionable Adhesive 7020, was purchased from Michaels yesterday. A png version of the Gimp image was printed to serve as template for the many parts.
After two days of assembling in a fashion similar to making packets over half a dozen are complete. The low tack spray is somewhat effective. When I need the parts held firmly, when adding a new part, the parts constantly come loose. When I don't want the parts held tightly, e.g. when removing the packet from the low tack glue, parts get pulled from the packet. But the glue is still better than no glue. After each packet is assembled veneer tape is applied and the packet held between sheets of wax paper under weight. A few packets are incomplete as they need small bits that could not be found, added and because gaps remain after assembly. These can all be repaired when the packets are dry, with a drop of glue and a cut part.
Interestingly, some parts were not cut, there is no evidence of the cut in the appropriate veneer. My use of the trace command can stand some improvement. A YouTube video covering how to enhance the image and the resulting tracing had some good suggestions. These parts will need to be cut separately. A few of the completed packets are shown below.


Began with the Levi's hand this morning. It was assembled, but is missing four pieces. Some pieces again seem to not have been cut as no corresponding holes could be found!? The photo below shows the hand before applying the veneer tape and pressing it.

After the hand four eyes were completed. Three of these are seen below. One is missing a key internal part that needs to be remade.


Took inventory of the completed packets this morning. After trimming some of the veneer tape from eyeholes, Ollie's face was temporarily pieced together. This is seen in the first photo below. The second photo shows most of the packets made so far and arranged somewhat according to final position. Working with these packets is challenging as they are all backwards; the front side of the marquetry is covered with the veneer tape. The last photo shows progress on piecing together the baby's hair. It has been assembled at least three times so far, and is not yet complete. The slightest bump and I need to start over, but I don't want to use the glue as this is probably the most complex packet with very fragile pieces.


The baby's hair was finally complete after five hours of work. It was taped with veneer tape and placed under the cutting mat to dry. Quite the arbeit. A photo of the completed packet after drying between sheets of wax paper and under slight pressure is shown below.

The baby's hand has been assembled. Assembly was first attempted with just hand pieces, but after adding the surrounding baby shirt, assembly went more smoothly as there was a large mass to push against. A second helping process was taping the lower part when it was finished and then assembling the top part. The hand will require significant post taping cleanup. The photo below shows the hand after pressing.

Assembling the boy's heads into the background was tackled next. This all has to be accomplished from the backside as the frontside is covered with tape. The first chore was cutting the tape from the edges of each assembly. this allowed each assembly to be attached to the background with veneer tape before further addition of pieces. The biggest challenge was working from the photo, which is now backwards, so the photo was flipped simplifying the process.
Happy 48th anniversary to my wife and I! Over twice as long married as unmarried!
A problem raised by working from the backside is that the entire packet still needs to be taped from the front with veneer tape, so must at some point be turned over. An experiment was run this morning with some veneer scraps. A few were arranged and taped with yellow Frog tape. This collection of pieces was flipped over and then taped with veneer tape. It was left to dry for an hour or two. With care the yellow tape could be removed and leave the small pieces still attached to the veneer tape.
The project was returned to today after a long break for a vacation with family in Denver, a great time spent with three sons, their spouses and the three grandsons. Of course that meant this present for my wife was not finished on time.
As it turns out the yellow tape has been a blessing and is easily removed from the veneer tape with few bits of veneer coming along for the ride. The one or two that do are easily glued in place. Prior to my departure the hair for the oldest grandson was completed. This morning the hair for the middle was completed. Both this hair and the one done previously have some gaps that will need to be filled.
The baby's hair was attached to his head and fit almost perfectly. A few bits of the head needed to be reduced for it to completely fit. Assembling in the fashion I have followed is not the best way to proceed. Putting packets together in isolation does not mean they will fit when packets are joined as slight gaps between parts in one packet leads to the incorrect size for the whole packet. Better would have been working from one side or corner and assembling to the opposite sides of the total picture. A good example is seen in the first photo below, where the baby's head fits well on one side, but overlaps with the fingers already assembled on the other side. In this case one finger was removed and will need to be rebuilt between hand and head. The second photo shows the hair and head assembled.


Until looking at the two photos above next to one another I did not notice the bit of dark veneer now missing from the baby's eye. With luck I will be able to find it and put it back in place. These tiny pieces will be the death of me!
The missing bit of the eye was located and glued into place on the veneer tape backing. The next three areas tackled were Levi's head, attaching the baby to the hand, and the baby's remaining eye. These both went reasonably well. Only a small area can be done at one time as the veneer tape once applied needs to dry under a bit of pressure to prevent veneer curling.
Multiple areas were targeted this morning. The baby's hand was put in place after narrowing it a bit. The baby was installed along with Ollie's ear. Levi was also put in place along with the bits of arm and neck. The two photos below document some of this work.


Starting to look like a picture! At least the back side of the picture.
Now that all of the major parts are in place, (see below) filling in the remaining holes has been tackled. The gap between the two brothers was filled with collected parts. Many of the remaining holes do not have parts, though a few do. Ollie's face was begun this morning. Two areas were filled. One along the hair line used both found and newly cut parts. These parts are cut by hand from scraps. His nose was not cut out by the laser as I must have forgotten to include that line. The part was cut by the laser and was traced onto the face. It was carefully cut out with the Xacto knife on the inside of the traced line. The veneer cut easily and the nose part was glued in place after retaping the front of the image, seen in the second photo below.


After an hour and a half all of the holes in Ollie's face have been filled except for a gap under his chin. This was accomplished by cutting scraps of veneer to the aproximate shape and size of the hole followed by gluing the pieces in place. After the glue dried another forty-five minutes was spent filling the tiniest slivers of open space. Once again the marquetry was placed between sheets of waxed paper under a cutting mat with weight on top while the glue dried. The photo below shows Ollie at this stage.

Began with the four largest holes in Levi's head this morning. These were traced and pieces were cut after transferring the tracing to the veneer. The parts were cut by hand with the Xacto knife and trimmed to fit the holes. Glue was placed in the holes with the knife and the new pieces pressed into place. The picture was returned to its spot under the cutting mat with with weight on top while the glue dried.
It is now a week and a day after the wife's birthday, but the end is in sight. Today and tomorrow should see the completion of filling holes. Next week will focus on gluing the picture to the MDF backer board, cleaning up the show face, applying a finish and making a frame.
A lot of the morning was spent completing Levi's hand, and some on his head as well. The completed hand is shown below. Completing the baby's hand will finish what can be done from this side of the marquetry piece.

A concerted effort brought the marquetry piece to completion. The Law of Diminishing Returns says it is time to stop. Depicted in the photo below is the entire piece at this stage. (Of course this is the back side, which will be glued to the backer board.) Well, just one more: a tiny gap was seen in Levi's neck in the photo and filled.

This morning a few more tiny gaps were filled and then I really called it quits. The picture was photographed (see below) and placed under the mat to dry. The picture measured 8 1/4" X 11".

A backer board was cut from 1/2" thick MDF. (I was unable to locate 1/4" MDF though have used it before.) A piece of my inexpensive backing veneer was cut to 9" X 11 1/2". Glue was spread on the backer board and the veneer was applied. The Xacto knife was used to trim the veneer to the size of the board. The board and veneer were put in the vacuum press as shown below.

Oy! This comedy of errors just turned into a nightmare of epic proportions! when removing the marquetry from the vacuum press I was dumbfounded as the picture was there for all to see. I glued the tape side to the board!

The next morning I soldiered on. Checking many different bits of veneer indicated none were loose. Maybe sufficient glue was used, soaking through the veneer tape and binding everything together. Drops of glue were placed on the tiny gaps and rubbed in with a finger. The entirety was sanded with 150 grit paper. Most of the pits were no longer pits, but a few remained so the gluing and sanding was repeated. The sanding on the downdraft table continued for some time until I felt no more bumps or pits. The 150 grit paper was followed with 220 also using the orbital sander.

Dust was blown off with air and then the face was vacuumed. The back was sanded only with the 220 grit paper and dust removed. Out in the garage the first coat of lacquer was applied to the picture side and allowed to dry for two hours. A second coat and after an additional two hours a third coat were applied. The lacquer was allowed to dry overnight before lacquering the back. The photo below shows the lacquered marquetry. The baby has the best gradations of color, but the two original photos were taken in very different lighting conditions, outside on a sunny day versus in the hospital room.

Happy Juneteenth! A note to Rhea for her birthday was written on the back with a silver Sharpie. The back was then painted with Lacquer. While the lacquer was drying the frame was prepared. The marquetry piece was carefully measured and is 8.25" X 11". The frame cutting jig was used to quickly cut the four sides. The first cut miters an end, then this mitered end is placed against the mitered stop block, set at the desired length plus 1/16", making up for the width of the blade.
The four sides were aligned with the frame gluing jig. Wax paper is placed under each corner. The jig was adjusted with the frame members in place until all corners were looking good. Glue was applied and the center blocks were clamped drawing everything tight. Some adjustment was needed as the corners were not well aligned vertically. The clamp was loosened, the corners aligned, and the clamp was tightened. The glue was allowed to dry for a few hours under pressure.

After removal from the gluing jig the jig for cutting spline grooves in the corners was used to cut 1/2" deep (probably a little deeper) grooves. A 1/8" thick strip of 3/4" cherry was cut with the table saw and then sanded to fit the grooves. The splines were glued in place and clamped as shown below.

The excess splinage (sic) was removed with the FatMax saw and the splined corners were sanded smooth. The splines went through to the inside of the frame as seen below. This waste was removed with a 1/4" chisel. The picture did not quite fit so a wide chisel was used to open the frame 1/32" in one corner. The second photo below shows the picture in the frame. I didn't realize how much of the picture would be covered by this molding and am a little disappointed. The marquetry needs a different frame, so it is off to Menards for some appropriate wood.


Oak molding, essentially a right angle, with a 9/16" depth on one leg and 1/4" on the other was purchased and cut with the framing jig. The four sides were glued together, corner dados cut, and splines glued in place as shown below. The splines were trimmed off and the entire frame sanded with 120 grit sandpaper. The marquetry did not fit vertically, so some of the inside edge of the frame on the bottom was chiseled away. The picture now fits tightly. The frame was sanded with 220 grit sandpaper and then given three coats of lacquer. The frame covers only a bit of the marquetry as planned.

The lacquered frame was marked and drilled for four holes. Two on the top and bottom were for screws and washers to hold the picture in the frame. The other two were for loops with screws for the picture hanging wire. The hardware was installed completing the marquetry project, only two weeks late. A final photo is seen below, though for some reason was much more yellow than expected, so the picture below used a filter to lessen the yellow and is closer to actual.

This project was a tremendous learning process, unfortunately mostly learning through mistakes. Some key takeaways are included in this closing note. First, don't use a greatly expanded picture size to determine where to make breaks between colors. This mistake led to exorbitantly more detail than necessary and hours of difficult assembly. With the picture at the correct scale this problem could have easily been spotted and avoided.
The second takeaway is gaining a better understanding of the cutting abilities of the laser engraver. Many of the lighter veneers have black edges from too much laser exposure with the wood. These veneers cut easier than others, but all veneers were treated the same. Of course, part of this issue was my rush to get all veneers cut while the machine was running. Each veneer needs to be tested for the minimal power, speed of traverse, and cutting repetitions needed to cut through without burning.
Takeaway three is veneer selection. In general the veneers chosen for this project worked well together and provide a nice gradation of color. The only issue was the one dark veneer that provided many large parts in the older boy's faces. These stand out much too distinctly. Part of this challenge is finding veneer of the correct color. Even with my selection of close to a hundred different types of veneer, finding the lighter shades is a challenge.
The fourth takeaway concerns assembly. The picture should not have been assembled in parts. This was done because that is the traditional means of doing marquetry, with packets. This piece should have been assembled from one corner to the opposite. Slight errors in the parts assembled made putting the parts together very difficult. In addition the veneer tape used for the parts had to be carefully cut away from the outer edges before the part could be put in place, not an impossible task, but neither was an additional challenge needed.
Takeaway five is a perennial problem for me. Pause! Don't rush through a step without thinking. Think through the ensuing processes before each step is tackled. These few seconds of thought will keep one from making bonehead mistakes, like gluing the taped side of the veneer to the backer board. It is still not clear what long-term effects this mistake might have.
